Friday, August 31, 2012

UFO Sunday

OK, so it's not Sunday today, but it will be Sunday soon, and I want to be ready!
Leah Day, over at the Free Motion Quilting Project, has started a UFO Sunday Quilt-Along and since one of my goals for this year is to lighten my load of random unfinished projects, I've decided to join this challenge.

I've got a few to choose from:

1.  The Sampler Quilt from the local quilt guild beginning quilting class I took 2 years ago in the Winter and Spring 2010 (thanks Margaret and Annie!).
status - Blocks are done, but just pinned on a flannel sheet.  
needs - blocks sized, sashings, borders, layering and quilting, and binding.
notes - I hope to quilt each block with an individual design to suit the pattern,
and I can't decide whether to put it all together first, or do a quilt-as-you-go (which I've never tried before)

2.  The Diamonds Quilt I started in a Kaffe Fassett Design Class 2 years ago in October 2010 (thanks Kaffe and Brandon!  And Anja!).

status - Almost done designing, but ran out of vertical wall space!  
needs - a little re-arranging, and 3 more rows of diamond design, then sewing diamonds together, layering and quilting, and binding.
notes - Fabrics are the focus, so quilting will be simple lines.


3.  Needle Turn Applique Sampler from a local class 2 years ago (thanks Judy) in September 2010.
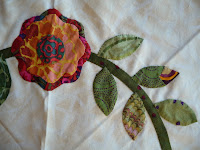
 

status - 2 blocks are done, 1 is half done, and one is not started yet (it's only a 4 block beginner sampler)
needs - blocks hand stitched, blocks sewn together, maybe a border, layering and quilting, and binding. 
notes - could do hand work as ferry wait line project (instead of knitting).  Uncertain about quilting patterns for applique.

4. Story Quilt from a Mary Lou Weidman class 1 year ago in May 2011 (thanks Mary Lou!).
status - What you see is what you get!  Although I do have the "story" part all sketched out and ready to go.
needs - the wonky border blocks finished, the story sketch photo copied/enlarged/outlined into pattern pieces, story pieces cut, arranged, and appliqued, story and border sewn together, layering and quilting, and binding, and embellishing.  
notes - this one has a long way to go!

5. Giant Flower Quilt from a class started last January (thanks Mary!).
 status - flower is fused, photo is all outlined into pattern pieces, and copied on tracing paper for proper placement, and I have all needed fabrics selected.

needs picture needs finishing (missing the bee you can see in the small 8x10 photo) - pieces cut and fused, then layering and quilting, and binding.
notes - quilting is mostly thread sketching, which I have never done before!

6. Turtles Quilt started in "Curves" class last January (thanks Barb!)

status -  one turtle finished.
needs - lots of work
notes - haven't decided what size quilt to make, or maybe this one will become a potholder!

Well, I hate to admit this, but I've also got two projects cut out but not sewn (a counting panel for granddaughter, and a raggy quilt for her too), plus several piles of fabrics that I fell in love with and started matching/blending with other fabrics for unknown projects . . .
Yikes, and I almost forgot the whole cloth quilt from Leah's stippling quilt-along that's all starched, and drawn, and ready to quilt
(wow it's hard to photograph red!) 
So now the only question is - Where do I begin?!

Tuesday, August 28, 2012

FMQ Challenge for August

Here we are in August already and another Free Motion Quilting challenge slides under the needle.

This month our teacher was Wendy Sheppard who gave us a fun little "Jester's Hat" pattern to try.  It looks pretty simple and straightforward, but it is a tricksy little rascal! 
I started out trying to draw it, and only started to make anything worth looking at after 4 pages of tangled spaghetti -
and even then I knew I didn't quite "get" it, but I went to the sewing machine to see what would happen.
I kept getting lost/stuck and throwing in random plumes and curves and points just to try to get out of a tight spot.  Kind of lost the little hats, but it looks pretty cool anyhow.
Then, as I was looking at this sample, I realized a simple fact.

The second tassel of the hat (the one that's round like a little pom-pom) is actually the first tassel (the pointy one) of an upside down hat!  
Big light bulb moment.  
You can see what I mean on the bottom of this closeup (from my second sample), as the hat on the lower left magically turns into the upside down hat going off diagonally in the lower right.
Then each point (on the end of a tassel or in the center of the hat) becomes a pivot to move the next part of a hat where you need it to be.  
Just make sure that when you place the "pom pom", you have enough room to swing that next tassel out somewhere.

As you can also see in the closeup, I still need to work on even stitch length (matching hand speed with machine speed).  Right now, I guess I can only think about one detail at a time!
So here is my second sample, in which I finally have little Jester's Hats!  (I washed this one after quilting, so it's a bit wrinkly just now - just click on the photo for a closer look to get past the wrinkles.)
Fabric is quilting weight solids, thread is Sulky Blendables 30 weight cotton #4108 American Antique (on the blue) and Sulky 40 weight Rayon #1021 Maple (on the black), needle is 90/14 topstitch, batting is Hobbs 80/20 cotton/poly.

And thanks again to SewCalGal for hosting this great challenge!  
Every month is a new adventure!

Monday, August 13, 2012

Summer Blues - Woven Shibori Part 1

I found some new ways of weaving Shibori, and have been having lots of fun with my rigid heddle loom and the Indigo Vat.

Woven Shibori creates a tie-dye effect by weaving in a strong pattern thread that can be used to gather and tie up the fabric (after it is removed from the loom) and create a resist when the fabric is dyed.  


These scarves were all woven with white wool yarns, polyester kite twine for pattern threads, and overdyed with natural Indigo.  Here you can see the white pattern threads (the polyester did not take up the dye).  After they were dyed and untied, the texture created by pulling the threads tight still remained.  This three dimensionality will always be there a little bit, but it can be lessened dramatically by gently steam pressing (wool setting used here). 


The first two are a style called Taiten Shibori, in which the pattern threads are woven right in as if they were just part of the weave.  In the top sample, the pattern thread is in the warp, which means the weaving is all just single shuttle plain weave! 

The bottom sample has the pattern thread in the weft (so it's a two shuttle weave - one fabric yarn and one pattern yarn).  My example used a kind of a random Fibonacci sequence in placing the shots of pattern thread.

Notice how the pattern ties are only a suggestion to the dye, and the dye sometimes goes in unexpected and exciting directions!

When the Taiten pattern threads are removed (after the fabric has been tied up and dyed), there will be a lace-like gap in the fabric.


The next three create the pattern by using a pick up stick with the pattern shots.  In these, the pattern thread is a supplementary thread and is not part of the plain weave structure.  When this thread is later removed, there is no gap - just a solid plain weave fabric.

The lower two both use a random pick-up in front of the reed.  
This one is on a closed shed (heddle in resting slot) with pattern pick-up every 4th shot.

And this one is on an open shed (heddle in lower shed) with pattern pick-up every 6th shot.
The white patches and those little white dots are where the pick-up went under the threads and wove into the fabric.  The blue areas are where the pick-up went over the threads to create a float.

The final sample uses a set pick-up behind the reed (giving a regular repeating pattern) - you use the pick up thread every 4th - 6th shot and only in the lower open shed.
You'll notice that in the "group" shot, this one has a single solid blue weft-wise stripe - that's where I pulled too hard and broke one of my pattern threads before dyeing.  Looks kind of cool though.

On Sunday next, my rigid heddle study group will gather to do some woven Shibori, and the following Sunday we have our big Indigo Dye Day - so there's more Summer Blues coming up!  (I'll try to take some process photos too)